Create Your Own Collage Sheet
- Bel Mills
- Apr 29, 2022
- 6 min read
Updated: Jul 27, 2023

You've assembled an impressive collection of public domain images to use in your collage work. And if you read my last blog post, you know just where to find them. But now you need to take those images and turn them into something you can use. The answer: a collage sheet.
This post will show you how.
A quick aside: This is a system I developed on the fly, guided only by a shortage of patience and a lack of access to Photoshop/ Illustrator/ etc. It is by no means the only way to create a collage sheet and probably not even the best way. Okay? Let's begin.
A collage sheet is an assemblage of images arranged on a single document, intended to be cut out and used in collage or mixed media artwork. In the following steps, I'll show you how to create a collage sheet using just a smart phone and the help of a wonderful free app called Moldiv (cue fanfare).
All the photos below are screenshots from my iPhone as I went through the steps of creating the collage sheets above using my phone and the app mentioned. I am assuming your Androids are similar enough that you will be able to make use of these directions as well. It might be easiest to follow these steps reading this post on a computer while following the steps on your phone. The red arrows show you what to click next.
Step 1: Save Images to Your Phone
A) I'll start at the very beginning for those of you who might still be confused about pulling images from public domain websites. Start by pulling up my last post . It will look like the photo below: (If you already know how to do this, and you have a collection of public domain images saved to your phone, skip down to step 2)

B) Scroll down and you'll see a link to the Old Design Shop website that looks like the photo below. Click on the title of Old Design Shop as indicated by the red arrow to continue.

C) You'll be taken to the Old Design Shop home page where they showcase their newest image offerings. The day I visited (4/13/2022) I scrolled down and saw the very promising title "Vintage Ephemera Pieces". So I clicked on that title to see more

D) Once inside the "Vintage Ephemera" collection, I scrolled down and spotted this lovely calendar from the 1800s. So I clicked on that. This is very important. You always need to click on the images you find before you save or download them, to make sure you are looking at the highest resolution version of that particular image.

E) When you click on the image it usually gets larger. The next step is to get your phone to add the image to your saved photos. There are usually a couple of ways to do this. A sustained click on the image often pulls up a menu with the option "Add to Photos." Click on that and you're done. Another option is to request to "Share" the image. First click the menu icon (horizontal lines) at the bottom of your screen and then select share as shown here:

F) Clicking "Share" brings up a new menu of options. Scroll down until you find "Save Image" and click as shown:

Ok that's it! At least that 's the hardest part. Once you have a nice collection of 10 or so images in your photo album, you're ready to move on. I recommend you create a dedicated album called "collage images" on your phone if you want to stay organized and save time later.
Step 2: Make Your Collage Sheet
On to Moldiv! My son Isaac introduced me to this app and I've loved it ever since. Here it is on my phone, circled at the bottom of the screen. That's Isaac on my wallpaper! He is one of my 16-year-old twins and also my trusty tech support.

A) Opening Moldiv leads you to a menu of options and you will select "Collage," like so:

B) Now this is important, in order to be able to control the sizes of your images, and ensure they won't be cropped by the app, you need to select "Free Style" for the layout design.

C) Now you'll be directed to choose an album from which to select your collage sheet images. If you've created a special album for your collage images, as I suggested in my last post, finding them will be easy peasy. Here is my screen when I am in my collage images/sheets album, and here I am selecting a lovely red camellia. As you select images, they will show up in the boxes at the bottom of the screen. You're allowed 16, max. I usually do around 10-12 or my images get too small.

D) Once you are satisfied with the images selected for your sheet, click the save icon, which looks like a check mark inside a box near the bottom:

E) images will then be dropped into a nice pile right in the middle of your collage sheet!

F) Now the fun starts! Move your images off the pile and around the sheet with your fingers. You can pinch or spread your fingers to shrink or enlarge your photos, and also rotate them, etc.

G) Here I'm showing the process of arranging my images. Double clicking an image gives you the option to remove it. Clicking any image brings it in front of all the others. It's all fairly intuitive and you'll get the hang of it quickly.
H) If you end up with a space you'd like to fill, just click the space and you'll be taken back to your photos to select more.

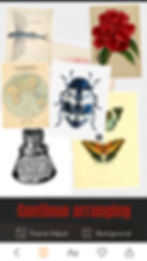
Take care that none of your images are encroaching on any others. For example, in the image above, it escaped my attention that the negative space around the beetle clipped the edge of the globe to his left. It's not a big deal to me because I wouldn't leave this entire globe exposed in a collage without something overlapping it. But if you want everything whole, pay close attention at this stage. Removing the backgrounds on the images would solve this problem but I haven't learned that skill, yet. And if you have, then you probably don't need this tutorial!!
I) Onward! Save your collage sheet by clicking on the "share" icon at the bottom of your screen:

J) You'll be asked to choose the size of the file. CHOOSE THE MAX! High resolution is key.

You did it! Moldiv will show you a progress bar as it saves your collage sheet as a new image in your photo stream. Go collect the image and add it to your album of "collage images" or create a new album called "collage sheets."
After creating this collage, I realized I hadn't included the cool calendar from the 1800s that I found at the beginning of this post. Following the same process outlined above, I quickly created another collage sheet with the calendar and other images ephemera images I found online.

Then, I remembered some lovely ephemera images I'd spotted on the website The Viintage and made yet another sheet. You see how this goes. Once you start it's hard to stop. And why should you?

It's all very satisfying once you get the hang of it. Choosing images for your sheet and arranging them is a bit like creating a visual mixtape (if you're old enough to remember that pastime). And, though the images will be separated once you cut them out, it's fun choosing which images to put together and how to arrange the sheet. Here are some other sheets I've made in the past. You'll notice my favorite images from around this time found their way onto nearly every sheet (pink cabbage roses, I'm looking at you!)


And, in closing, here are a few examples of artist books and mail art that incorporated images from the above sheets, so you can see these images in action. I typically apply collage images using a good glue stick like UHU or Avery and then seal the collage with gel medium, matte medium, or clear gesso.


And.....that's all! I hope this post solved some problems for you, and that your collage art reaps the benefits. Please leave comments or questions if you have any. Happy bookmaking to all!
Like This Post?
You can get more regular content like this by becoming a member of my email list!
Curious about what classes I'm currently offering?
You can peruse the catalog here